My husband is in an accountant. Budgets and bookkeeping are sort of his thing. He's great at it, too. I absolutely hate dealing with the financial stuff, so I feel very thankful that he has a knack for it and a willingness to do it for our family. Thank God! But, being married to a CPA means that all purchases and receipts need to be accounted for at all times. Not just for big purchases, but even the small, seemingly insignificant ones. What does this mean for our household? Receipts. Everywhere.
I thought maybe creating a folder or envelope for them would help. Then we can just place them in an envelope when we have a moment. Although the envelope is in the storage hutch in our dining room, it just never seems to happen that way. They end up on the counter, on the fridge, in pockets, on the floor, in random drawers, in the car, etc. Everywhere but the envelope tucked away in the storage hutch. This clearly was not working.
I decided to find a better way. My husband is great at getting his keys hung on the key rack in our house (which is located at the top of our basement stairway, hung on the wall). I thought, what better place to put receipts than near that key rack. As he drops off his keys, he can place the receipts there, too. I didn't want a large envelope this time either. It gets overstuffed and then he has to sort through it all. I figured it would be best to kill two birds with one stone. Let's not just create a place for receipts, let's create a SORTED organizational plan, too.
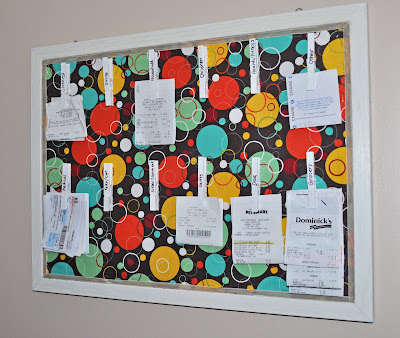
We had this old bulletin board that we used to have in the hallway there, but we never really used it. Random junk would accumulate there until we finally removed it and threw it out. It served no real purpose, so I made a purpose for it. I started by painting it white (all the molding and doors in our house are white). Then I cut a piece of fabric from some remnants I have in the basement. I laid the ironed fabric onto the bulletin board and stapled it all along the edges and in several calculated places in the center of the board to keep the fabric in place. I used some ribbon along the edges (hot glued it) to make the edges clean and straight, since the fabric was not perfectly cut. I then took 12 clothes pins and painted them white with spray paint. Once they dried, I labeled them with 12 different categories (such as Grocery, Children, Household, Car, Gifts, etc). I used hot glue to firmly glue the clothes pins onto the board in two rows.
I am really pleased with the outcome! Now the true test is to see whether or not it gets used! But, here are some pictures of the final product:


Michelle what a great idea. You will have to tell me how you made this so I can do one for my house!
ReplyDelete